This Shopify tutorial will guide you through the essential steps to create an impressive online presence for your business. As an e-commerce platform that powers over one million businesses worldwide, Shopify offers robust features and tools to help entrepreneurs like yourself succeed in the competitive e-commerce landscape.
This tutorial will cover selecting an appropriate theme that matches your industry and customizing it to represent your brand. We’ll also cover adding products, creating pages, importing products through CSV files, and integrating Oberlo for dropshipping inventory management.
Our comprehensive tutorial will assist you in launching your store while ensuring its optimal performance by utilizing Google Search Console and Google Analytics. Get ready to embark on a journey toward e-commerce success!
What Is Shopify? (And How It Works)
Shopify is most likely one of the world’s most well-known eCommerce builders. But everyone needs to understand this tool and how to use it.
Shopify is a SaaS software that you pay a monthly fee to use. It includes all the tools to set up, manage, and grow an online store.
It enables you to sell physical and digital goods to customers worldwide. It comes with a website builder to assist you in creating a professional storefront, product management tools, shipping and tracking software, payment integration, and other features.
It aspires to be a one-stop shop for eCommerce store management. If you want to build a functional and profitable eCommerce store, this is the only tool you’ll need to invest in.
How Much Will Shopify Cost You?
Shopify offers three different plans, Basic Shopify, Shopify, and Advanced Shopify, in addition to the 14-day free trial.
Most store owners will begin with the Basic Shopify plan, which can support stores with up to $20,000 in monthly sales. The main distinction between each plan is the number of transaction fees you’ll have to pay and the shipping discounts you can provide.
As your store grows, you can upgrade to more expensive monthly plans, but to save money, start with the free trial, then the Shopify Basic plan.
How to Make a Shopify Store in Record Time?
You’ve come to this page to open your first Shopify store immediately.
Follow this step-by-step guide, and your first Shopify store will be up and running quickly.
#1. Sign Up With Shopify
The first step is to create an account. Shopify offers a generous 14-day free trial, allowing you to create an account and build your store with no money down.
So, go to Shopify and begin your free trial.
Enter information about yourself and your business, then press the ‘Next’ button.

You’ll need to enter more information about your store on the next screen. This is useful because it will assist Shopify in configuring your storefront for the specific products you’re selling.
You’ll be taken to your Shopify dashboard once you’ve entered all the necessary information. This will be your headquarters for everything related to creating and managing your store, so settle in.
#2. Choose Your Store Name
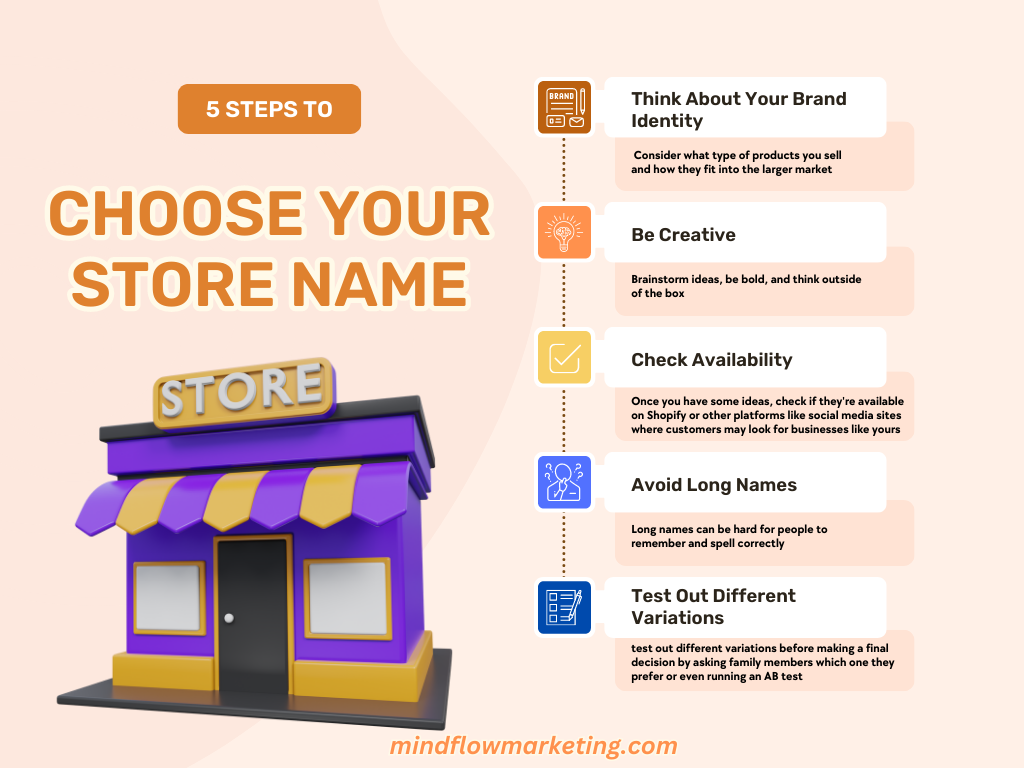
Choosing a store name is an important step when creating your Shopify store. It’s the first thing customers will see, and it can make or break their decision to purchase from you.
You want something that reflects your brand but stands out from the competition. Here are some tips for choosing the perfect store name:
Think About Your Brand Identity
The name of your shop should reflect who you are as a business. Consider what type of products you sell and how they fit into the larger market. What makes them unique?
Are there any special features or benefits that set them apart? Use these elements to create a memorable name that resonates with potential customers.
Be Creative
Get creative with your naming process!
Brainstorm ideas, be bold, and think outside of the box. Think about puns, alliteration, rhymes – anything that could help make your shop stand out in people’s minds.
Try to include keywords related to what you do so it shows up more easily in search engine results pages (SERPs).
Check Availability
Once you have some ideas, check if they’re available on Shopify or other platforms like social media sites where customers may look for businesses like yours.
This way, you won’t waste time coming up with names only to find out someone else has already taken them!
Avoid Long Names
Keep it short and sweet – long names can be hard for people to remember and spell correctly, which could lead them away from finding your shop online instead of towards it!
Aim for one to two words max unless necessary; stick with shorter ones that pack a punch!
Test Out Different Variations
Don’t settle on just one option right away; test out different variations before making a final decision by asking family members which one they prefer or even running an AB test on potential customers through surveys etc.
This way, you can get feedback directly from those who matter most – shoppers themselves – helping ensure success down the line when launching officially!
Once the domain name has been successfully registered through Shopify directly or via a third-party provider, it is important to link this URL back into your store settings within Shopify. This will enable customers to easily access all products offered by clicking on this address when visiting online.
By doing so, shoppers are spared from manually typing in long URLs, which may lead them away from purchasing items due to confusion caused by multiple domains associated with one store page; thus making life easier for both yourself and potential buyers looking at what’s available.
#3. Register Your Domain Name

When setting up a store on Shopify, the first step is registering your domain name. This can be done through Shopify or another third-party provider like GoDaddy.
If you’re using Shopify, the process is straightforward. All you need to do is enter your desired domain name and check if it’s available.
If it isn’t, try adding a hyphen or changing the spelling slightly until you find one that works. Once you have an available domain name, click “Add Domain” and follow the prompts to complete registration.
For those who choose to register their domain with a third-party provider like GoDaddy, some extra steps are involved but nothing too complicated.
First, search for your desired domain name and see if it’s available from any of their providers (GoDaddy has over 70).
If not, try adding a hyphen or changing the spelling slightly until something pops up as being available for purchase.
After selecting an option that works for you, add it to your cart and proceed with checkout, where they will ask for personal information such as address and payment details before completing the registration of your new website URL!
Once registered successfully with either method mentioned above – whether through Shopify directly or via a third-party provider – make sure to link this newly acquired URL back into your store settings within Shopify so that customers can easily access all products offered by clicking on this address when visiting online!
This way, shoppers don’t have to manually type in long URLs, which may lead them away from purchasing items due to confusion caused by having multiple domains associated with one store page – thus making life easier both for yourself as well as potential buyers looking at what’s on offer at any given time!
#4. Choose the Right Shopify Theme
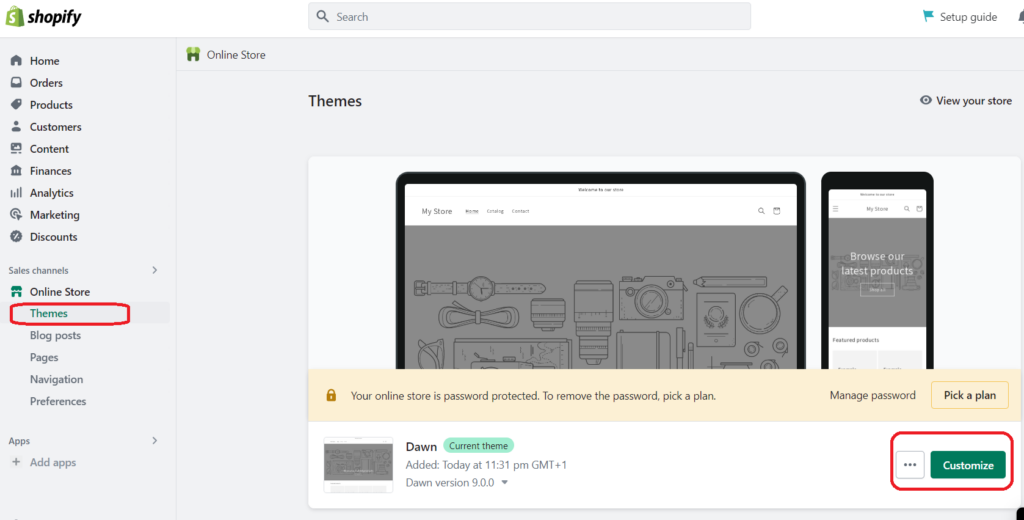
Deciding on an appropriate theme for your e-commerce site is essential as it establishes the basis for its arrangement and user experience. With over 70 paid or free themes available on Shopify, you can choose one that caters to various industries and aligns with your brand identity.
If more customization options are needed, consider working with a WordPress designer.
Exploring different industry-specific themes
To help you find the perfect theme, Shopify offers an extensive library of free and premium themes designed specifically for different industries such as fashion, electronics, health & beauty, home & garden, etc.
You can browse through these categories by visiting their theme store. Each theme has unique features like responsive design, customizable layouts, product filtering options, and social media integration.
Customizing themes according to brand identity
Your chosen theme should reflect your brand’s personality while providing an optimal shopping experience for customers. To achieve this balance:
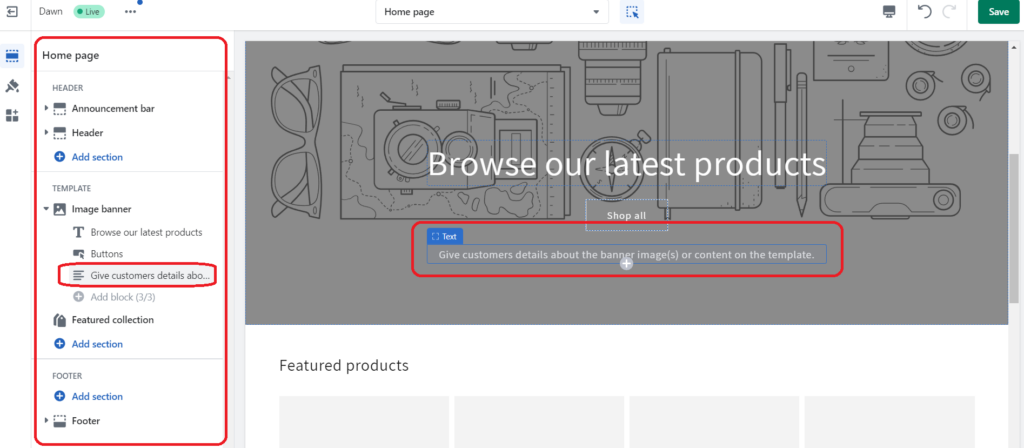
If you need more advanced customization options, consider hiring a Shopify expert or using third-party apps like GemPages Page Builder.
#5. Optimize Your Store’s Settings
Optimizing your store’s settings is key to having a successful online business. Shopify’s default settings are great, but there are some changes you can make to get the most out of your store.
Let’s walk through it step-by-step.
Start by clicking the Settings button at the bottom left of your dashboard and go to General Settings. You can edit your store name, email, address, and more here.
If you change your store name after signing up, update it now. The Account email is what Shopify will contact you through (customers won’t see this email).
The Customer email is what customers will contact you through – I recommend creating a [email protected] for this purpose so multiple people on your team can use the same account if when needed later on down the line.
Enter the Legal name of your business if applicable and edit any other information as necessary before saving all changes made here!
Next up is Payment Provider Settings, where clicking “Complete account setup” allows customers to use credit cards for purchases from their end; fill out everything on this page, including Product details (i.e., Retailer of Matcha Tea) and Statement Descriptor, which should be set as either company or store name respectively – Shopify should automatically set up PayPal but double check that just in case!
Checkout Settings allow customers to create an optional account while Form options require first & last names entered when checking out; Email marketing should have the “Preselect sign-up option” checked off, too, for maximum reach potential with the current customer base already established here!
Additional scripts box should include custom conversion code if Google Analytics or Facebook pixel has been set up prior; otherwise, watch the video guide provided under the Preferences section instead for help with setting these things up properly now before moving forward further still.
Shipping Settings depend upon how items are shipped – dropshipping uses Price based rates. In contrast, self-shipping requires USPS Discounted rates configured accordingly plus free shipping over certain spends offered whenever possible (advertise this prominently throughout the site!).
Account Settings provide access privileges via partner virtual assistant accounts created here. At the same time, Legal Settings generate Refund Policy, Privacy Policy & Terms of Service Agreement templates used when creating pages related to it afterward!
Lastly, Preferences cover meta title & description text seen in search engines plus tracking codes added from Google Analytics or Facebook Pixel once the registered domain has been purchased successfully via Online Store > Domains tab instead then saved altogether soon enough after that finally.
#6. Adding Products and Creating Pages
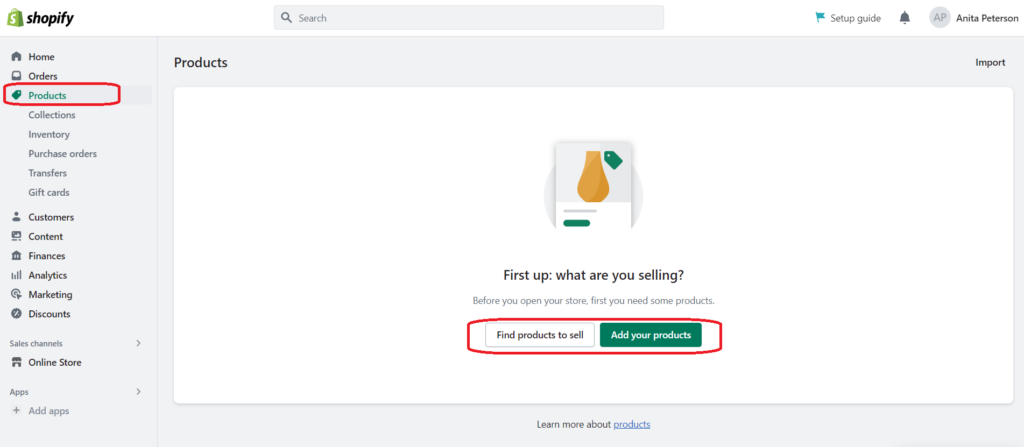
Accurate product information is essential when setting up an online store. You can add products manually or import them via CSV files if applicable. Integrating third-party apps like Oberlo simplifies inventory management for businesses relying on dropshipping.
Additionally, create pages showcasing relevant content about your business.
Importing Products Through CSV Files
If you have many products to add to your Shopify store, importing them through CSV files can save time and effort.
To do this, follow these steps:
Create Your Essential Pages
Creating essential pages for your e-commerce store is crucial in setting up a shop. You can provide customers with the information they need to make informed purchases with them.
A Contact Us page should include all of the ways customers can reach out to you – whether through email, phone, or social media channels.
Ensure this page also includes any customer service hours and response times so shoppers know when they can expect an answer from you.
An About Us page gives visitors insight into who you are as a business and what makes your products unique. This is where potential customers will understand why they should buy from you instead of another company.
Include details about your mission statement, history, team members, awards or certifications, and more!
Finally, a Shipping Policy page outlines how orders are processed and shipped from your store.
Include information on estimated delivery times (domestic vs. international), shipping costs (if applicable), returns exchanges policies (if applicable), and other relevant info here so that buyers have everything they need before making their purchase decision.
By creating these essential pages for your e-commerce store upfront, you’ll save yourself time down the line.
#7. Enhancing Your Store with Apps and Add-ons
With over 3,200 apps and plug-ins designed specifically for streamlining certain aspects of running an online business on Shopify, it’s essential to make the most of these tools. To maximize your store’s potential, we’ll explore a few apps to optimize the user experience and streamline functionality.
Utilizing GemPages Page Builder for Customization
GemPages Page Builder is a powerful app that allows you to customize your Shopify store without any coding knowledge. With its user-friendly drag-and-drop interface, you can easily create attractive pages for landing, products, blogs, and more.
This app offers various pre-designed templates catering to different industries or niches so that you can quickly build a professional-looking website in no time.
Improving Search Engine Rankings with SEO Manager App
Consider using the SEO Manager app to ensure your online store ranks high in search engine results pages (SERPs). This comprehensive tool helps optimize your site by identifying potential issues, such as broken links or duplicate content, while providing actionable recommendations for improvement.
Additionally, it assists in managing meta tags effectively – boosting visibility on Google and other search engines.
Email Marketing Integration: Privy App
Incorporating the Privy app into your Shopify store can significantly improve email marketing efforts. By capturing visitors’ email addresses through pop-ups offering discounts or special promotions, you can effectively grow your subscriber list and nurture leads.
Furthermore, Privy integrates seamlessly with popular email marketing platforms like Mailchimp and Klaviyo – making it easier to manage campaigns directly from your Shopify dashboard.
By taking advantage of these powerful apps and extensions for your e-commerce store, you can create a more interactive buying experience while streamlining various facets of running an online business on Shopify.
#8. Configuring Payment Gateways and Shipping Settings
Properly configuring payment gateways is essential for a smooth online shopping experience. By integrating popular options like PayPal Express Checkout, Braintree Payments, and Stripe, you can offer your customers multiple ways to pay for their purchases.
The ‘Shopify Payments’ option also allows users to accept credit card transactions directly through their stores without needing third-party processors.
Setting up payment gateways like PayPal, Braintree Payments, and Stripe
Besides setting up various payment options, it’s crucial to accurately configure shipping zones and tax rates based on specific jurisdictions where orders are being shipped/delivered from/to (i.e., automatic tax calculation feature).
Configuring shipping zones and tax rates
These steps ensure a seamless customer checkout process while keeping your store compliant with regional regulations. For more detailed guidance on configuring payment gateways and shipping settings in Shopify, refer to their comprehensive payment gateway documentation and shipping setup guide.
#9. Launching Your Store and Monitoring Performance
Once your Shopify store is set up, you can launch it and begin testing payments with password protection enabled. However, before going live, some important aspects need attention.
Testing Payments with Password Protection Enabled
Testing payments is crucial to ensure a smooth shopping experience for your customers. Shopify allows you to test payment transactions without processing real orders or incurring charges. During this phase, enable password protection on your online store to prevent unauthorized access and unintended visitor purchases.
Utilizing Google Search Console and Google Analytics for Performance Monitoring
After launching your Shopify store successfully, monitoring its performance becomes essential. Two powerful tools that can help you gain valuable insights into customer behavior patterns/preferences are:
Google Search Console:
This free tool helps track website traffic data and identify potential issues related to indexing or crawling pages by search engines like Google. To get started:
This tool provides comprehensive data on user behavior, such as page views, bounce rates, and conversion goals. To integrate Google Analytics with your Shopify store:
Analyzing performance metrics from both tools helps you optimize marketing strategies and increase overall revenue from online sales. Stay proactive in monitoring trends and making necessary adjustments to ensure long-term success for your Shopify store.
Frequently Asked Questions About How to Build a Professional Online Store Quickly
Conclusion
You can quickly set up a professional online store with Shopify using the right tools and guidance. By following this Shopify tutorial step-by-step, you’ll be able to choose the perfect theme for your store, add products and pages quickly and easily, enhance it with plugins and add-ons as needed, set up navigation menus & payment gateways without any hassle, launch your store on Shopify successfully – all while monitoring its performance so that you stay ahead of the competition. Creating an online store has never been easier with this comprehensive guide at hand.
Take your online store to the next level with our Shopify Tutorial! Learn how to quickly build a professional, successful eCommerce business and get ahead of the competition.